|
What is new in Condes 10
|   |
|
What is new in Condes 10
| |
Condes 10 comes with numerous improvements and new features. This article gives you an overview of the most important new features in Condes 10. You will find improvements all across the program, intended to make it easier to use; many more than it's possible to describe in this overview.
In addition to what is included in the initial Condes 10 release, additional features are released on a regular basis. These updates are included in your license for a 3 year period from your license's issue date.
Condes features are designed based on kind feedback and input from users. Such feedback is essential for the continued improvement of the software, and the author is happy to receive your e-mail with feedback. A large number of requests for additional functionality have been received. Even though the majority of these requests are very useful ideas and suggestions, evidently, it has not been possible to fulfill all of them in Condes 10 yet. This does not mean that they will not be implemented. Condes 10 is a good foundation to build new functionality on, so the work continues.
Course Design
|
|
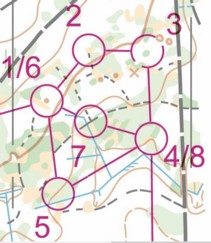
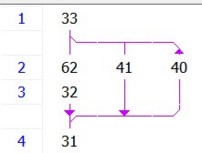
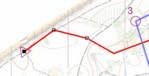
Loops are commonly used to avoid following, for example if you have a mass start. So-called "butterflies" were introduced in Condes 9. A butterfly uses a common control and 2-6 loops of controls. Competitors run the loops in different order, coming back to the common control after each loop. Condes 10 introduces support for "diamond" loops. A diamond uses two common controls: an entry and an exit control, and 3 branches: 2 branches from the entry control to the exit control, and one branch back. Competitors start with the entry control, and take the two "forward" branches in different order, going to the exit control, and using the "backwards" branch back to the entry control. You create a course with butterflies or diamonds by first creating a normal course, then adding the loops to the course. This is done in the Course window, which you can open from the Course Layout Editor by using the menu Course / Edit, or by simply double-clicking on the map. The course shown at the left has a diamond with entry control 33 and exit control 31. This generates two variations: AB, and BA, where AB takes controls in the order -33-62-32-31-40-33-41-31-, and BA takes the loops in the opposite order, so -33-41-31-40-33-62-32-31-. In the Course Layout Editor, you can select to show either of the two variations. In the printout window, you can select the variations to print. You can mix butterflies and diamonds on the same course. Adding multiple butterflies or diamonds to the same course creates additional variations. You cannot add butterflies or diamonds to a relay course. |
|
|
When editing a course, and using the "insert control" tool to add controls to the course, control circles for all existing controls are shown, so that you can choose which one to insert. However, it can be useful to see all control circles even when not inserting a control. This is now possible. |
|
|
Forbidden Route symbols can now be rotated. Use the "rotate" tool when a Forbidden Route symbol is selected. |
|
|
When two course leg line intersect each other, one of the lines is automatically cut. Similarly, a course leg line that overlaps with a control number is automatically cut.This feature can be enabled/disabled in the Additional Dimensions and Fonts dialog. |
Course Layout Editor Enhancements
|
|
In the Control Dialog, the control descriptions tab is reorganized, and it now has a preview of the control circle. This makes it easier to check the control descriptions.
|
|
|
When editing a marked route line or a route choice, there is a new line editing feature. A rubber band is used when inserting points into the line. Creating a route choice line is as easy as drawing the line with the mouse. |
|
|
To cut a segment out of the line, you use the scissors tool. Click once on the line and a 1 mm segment is cut from the line, or click and drag the mouse to define the segment to be removed. |
OCAD Support
Control Descriptions
Graphics Layout
Printing and Export
Event File
64-bit version