|
Course Layout Editor
|   |
|
Course Layout Editor
| |
The Course Layout Editor is a graphical editor for on-screen course design. The Course Layout Editor is also known as the CLE.
This section has the following topics:
The Canvas and the Navigation Bar
|
|
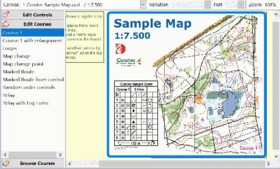
The main portion of the Course Layout Editor window is called the Canvas, and this is where the map and the course are shown. Anywhere on the canvas, you can use the right mouse button to open a pop-up menu that gives you options depending on the context. To the left of the canvas is a Navigation Bar. The navigation bar has three panes, which you switch between by clicking on their headings: "Controls", "Edit Courses", and "Browse Courses". The navigation bar controls what is shown on the canvas:
|
You can create a control, a start point, or a finish point, by selecting the appropriate tool in the Course Symbols toolbar to the right of the canvas, then click on the canvas where you want the control (or start or finish) to be located.
If you want to move a control's circle or control number, you need to select the control. Click inside the circle. Four black rectangles (handles) appear at the corners of the enclosing rectangle for the control, and the control circle changes color to blue. This indicates that the control is selected.
When a control is selected...
You can create a course by right clicking on the canvas and selecting the menu option New Course, or by selecting the appropriate tool in the main toolbar, or by using the main menu option Course / New.
When a course is selected and is shown on the canvas, you can double click anywhere on the canvas to open a Course dialog window where you can manipulate various properties of the course, including the controls that are on the course.
When you have created a course, you can "draw" the course by using the "Insert Control" tool. See for example Introduction to on-screen course planning
When a course leg is selected...
You can design a graphics layout for a course, consisting of texts, external graphics elements (bitmap files or map files). You have the following tools to choose from: Text, Overlaid Graphics, Mask Area, Condes Logo. You can place "objects" of these types onto the canvas. These objects appear above the map, but below the course. You can move the objects up and down in the so-called Z-order, meaning that you can move one object in front of or behind another. For each object, you can select whether this object is visible on all courses on the canvas, or only the currently selected course. This allows you to adapt the layout to each individual course.
In addition to this, there is also the print area frame, which you can modify to fit the course, or keep identical for all courses on the canvas. The frame width and color can be modified to suit your need.
This allows you to create elaborate graphical layouts so that the combination of map, course and graphical layout can be used directly for printing.
The Browse Courses mode in the Course Layout Editor lets you see multiple courses simultaneously. Each course is shown with a different color, and you can select/unselect each course individually via the navigation bar to the left of the canvas.
Course mode, Graphics mode, Route Choice mode, and Insert Controls mode
The Course Layout editor has three "modes": Course Editing mode, Graphics Editing mode, and Route Choice mode
The three modes exist to facilitate editing without accidentally selecting and moving the wrong type of object. thus:
These are a couple of shortcuts that make navigation easier:
There are four toolbars associated with the CLE:
In addition there is the Condes standard toolbar
Each of these toolbars are described below.
Above the canvas is the Course Edit Standard toolbar. It lets you choose between the five canvases supported by Condes, and it shows which course and variation is currently shown, as well as the zoom level and the course length.
|
Click |
To |
|
|
|
|
|
|
|
|
|
|
|
|
|
|
|
|
|
|
|
|
|
|
|
|
|
|
|
|
|
|
|
|
The Course Layout Editor has a toolbar at the right border, which lets you select among the tools you can use to design the course and the course layout.
This toolbar has the tools to draw symbols that are normally used on a course, such as controls, start points, finish points, end of marked route, control descriptions, refreshment point symbols, registration marks, crossing point symbols, first aid symbols, forbidden route symbols, Out of Bounds area, and boundary lines.
This toolbar has the tools to insert graphics objects, such as lines, texts, masked areas, overlaid graphics, and Condes logos.
The following buttons in the Condes standard toolbar are particularly useful in the Course Layout Editor:
|
Click |
To |
|
|
Zoom in on the course layout |
|
|
Zoom out from the course layout |
|
|
Set the zoom level so that the course fits in the window |
|
|
|
|
|
Press this button to switch on/off the configurable printout area for the course (or for "all controls"). |
|
|
Press this button to "dim" the background map in order to better see the course. |