|
Overprint Effect or Upper/Lower Purple
|   |
|
Overprint Effect or Upper/Lower Purple
| |
What is Overprint Effect?
The IOF recently changed its recommendation regarding how overprint effect is achieved on orienteering maps. It might be useful to take a look at what overprint effect is and why it is used.
First, let's have a look at Overprint Effect as it has been supported in Condes for many years.
|
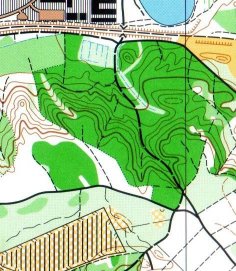
Real overprint Real overprint was what we saw many years ago when maps were offset printed with 5 colors.
Brown and green blend to form a darker color, making the contours easier to see in a green area. For the course overprint, as the term says, overprint ensures that the course symbols do not cover for important map details. For example, black symbols will always be visible through the course overprint, and so will many other symbols, though less prominently. 5 color offset print (1998) (Spot colors: Black, Brown, Green, Blue, Yellow) |
|
Why is it necessary to ”simulate” overprint effect?
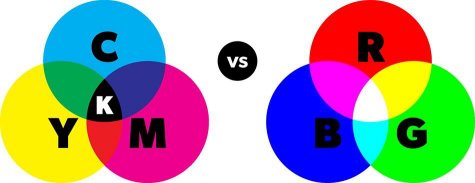
Nowadays, digital printing devices as well as offset printers use process colors (CMYK), where previously spot colors were used.
Almost all printing is done with CMYK colors. The 5 base colors (black, brown, green, blue, yellow) are produced by blending the 4 CMYK process colors. This blending is done in software before applying toner or ink to the paper.
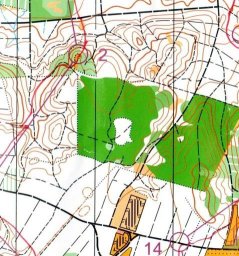
Unless instructed otherwise, the software does not blend colors between overlapping objects. When a new object is added, its color will "knock out" out underlying objects. Thus, the brown contours will not appear darker in a green area - it will remove the green color where the contour is. This can make it much more difficult to see the brown contour in a green area.
|
Real overprint
|
No overprint
|
Brown ”knocks out” green 4 color digital print Process colors: cyan, magenta, yellow, black (2006) |
How to simulate overprint effect?
However, it IS possible to tell the software not to "knock out" the underlying color, but instead BLEND the colors between overlapping objects. This is called simulated overprint effect.
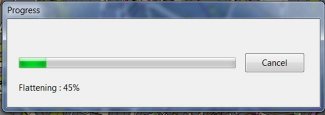
When printing, the software processes the map and calculates the ”blending” before printing. Overlapping objects are decomposed into smaller pieces. This process is often called ”flattening”.
Different printing work flows
As can be seen on this diagram, there are to main work flows to get from the digital course and map to the printed map. One is to use a PDF file - the other is to print directly to the Windows printer.
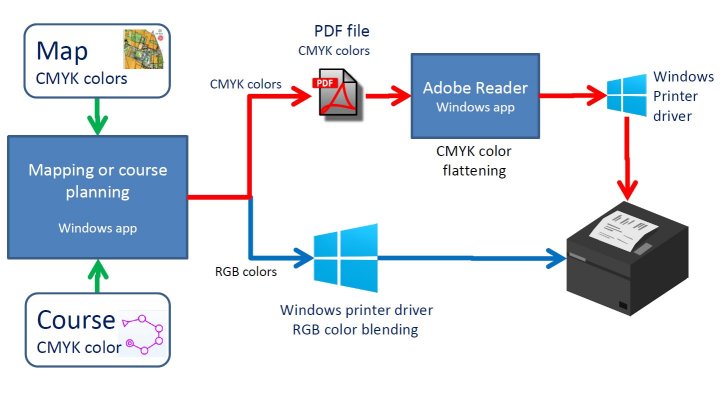
The PDF work flow
Adobe Reader support for flattening
Adobe Reader is a free application from Adobe. It can be used to view and print PDF files. Adobe software packages, such as Adobe Reader supports simulated overprint effect, and is a good candidate for printing map PDF files.
You may recognize this pop-up when printing from Adobe Reader:
Thus, the work flow is as follows:
Make sure to configure Adobe Reader preference to use ”Overprint Preview”:

Or – preferably – use ”Blend mode DARKEN” when exporting the PDF file from Condes, instead of overprint. This eliminates the use of specific settings in Adobe Reader
The Windows printer work flow
Windows' native color system is based on RGB (Red, Green, Blue) colors. Most maps use CMYK colors.
Thus, when printing a map directly to a Windows printer, Condes must transform map CMYK colors to Windows RGB colors. Windows can ”blend” overprinting colors in the RGB color domain, so you get a very good overprint effect, though not always quite as good as when using PDF and Adobe Reader.
Map colors vs Windows colors
Thus, you can print directly from Condes to a Windows printer and achieve almost as good quality as when using Adobe Reader.
Please note that when printing to a PostScript based printer, you need to disable the setting in Condes that lets Condes generate the PostScript code to the printer.
When would you NOT use overprint effect?
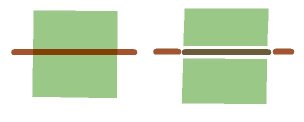
The latest IOF map specifications recommend to use a different approach to achieve a kind of overprint for the course overprint. The idea is to place the control circles and leg lines underneath the black symbols so that the black symbols "knock out" the course color and thus ensure that black symbols are not "hidden" by the course. Thus, the course overprint is split into an "Upper Purple" and a "Lower Purple" layer. The Upper Purple layer is printed on top of the map as is normally done, but the Lower Purple layer is merged in between map color layers, so that Black and some other map color layers are on top of the Lower Purple layer.
The reasoning behind this approach is a little bit unclear, and the clear drawback is that there is no overprint effect for map colors, i.e. brown contours and blue watercourse symbols in green areas will knock out the green color.
The IOF map specification approach is of course mandated for maps used at IOF events. For all other events, it is still fine to use overprint effect.
To achieve output according to this approach, you need to use an OCAD map file in Condes.